前回の解説でパスワード認証のクロスプラットフォーム PowerShell リモーティング環境が構築出来ました。
PowerShell 6 へリモート接続する(クロスプラットフォーム/パスワード認証編)
http://www.vwnet.jp/Windows/PowerShell/2018031701/PsRemoteOverSSH.htm
今回は、この環境に少し手を加えて公開鍵認証にしてみましょう。
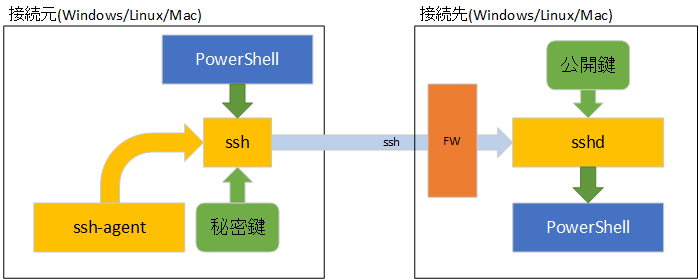
公開鍵認証は ssh が持っている機能で、PowerShell リモーティング over ssh では、認証を ssh の公開鍵認証に任せる事が出来ます。
PowerShell リモーティング over ssh(公開鍵認証)
これは、接続相手先が Windows OS でも実現できるので、認証管理が面倒なワークグループな Windows だけの環境でも導入メリットがあります。
ドメイン環境でも公開鍵認証は可能ですが、接続に使用するドメインアカウントのプロファイルに鍵をセットする必要があるので逆に手間がかかるので、ドメイン環境への公開鍵認証は微妙ですね。
鍵ペアを作成する際に、秘密鍵にパスフレーズを設定します。(省略可能ですが、セキュリティ上設定することが望ましい)
リモート接続すする際にこのパスフレーズを都度入力するのですが、ssh には ssh-agent サービスが備わっており、このパスフレーズ入力を代行してくれます。
つまり、ssh-agent を使えば、接続に使用するアカウントを指定するだけでリモートコンピューターの PowerShell に接続できるという素敵な環境になります。
【お願い】
便宜上 administrator / root で説明をしていますが、運用環境では
administrator / root は使用せず、管理用のアカウントを別に作成してください。
前回構築した PowerShell Remoting Server の設定は、公開鍵認証(PubkeyAuthentication)を有効にしているのでサーバー側の設定は不要です。
前回と同様に、Index 置きます
PowerShell Remoting Client(Windows Server 2016 / Windows
10 1709(RS3) 以前) の設定
PowerShell Remoting Client(Windows 10 1803(RS4) 以降) の設定
鍵ペアの作成と ssh-agent 登録/PowerShell Remoting Client(Windows)
公開鍵の登録/PowerShell
Remoting Server(Windows Server 2016)
初めての公開鍵認証 PowerShell over ssh(Windows to
Windows)
公開鍵の登録/PowerShell Remoting Server(CentOS 7)
初めてのクロスプラットフォーム公開鍵認証
PowerShell over ssh(Windows to CentOS 7)
鍵ペアの作成と ssh-agent 登録/PowerShell
Remoting Client(CentOS 7)
まとめ
Windows Server 2016 と Windows 10 1803 より前のバージョンの PowerShell Remoting Client は、Path を通して ssh を使えるようにしただけなので、ssh-agent が使えるようにするために Win32-OpenSSH をインストールし、サービス設定をします。
ざっくりと環境構築の流れです。
・ Win32-OpenSSH インストール
・ ssh-agent サービス自動起動設定 / サービス起動
では構築手順です
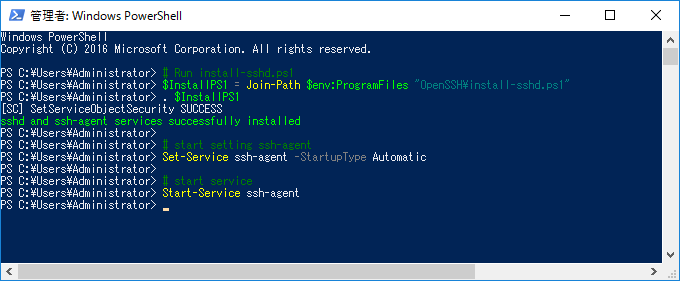
PowerShell Remoting Server と同じで、install-sshd.ps1 を管理権限で実行しサービスを登録します。
GUI でも、PowerShell でも構わないので、ssh-agent サービスを「自動起動」に設定し、ssh-agent サービスを起動します。
簡単ですね
PowerShell で設定するのであれば、以下をコピペします。(要管理権限)
|
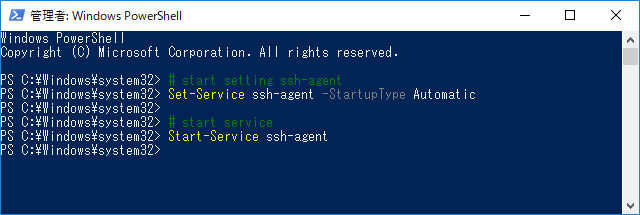
Windows 10 1803(RS4) 以降は ssh Client が OS 標準で入っているので、ssh-agent サービスの自動起動設定と、ssh-agent の起動だけです
PowerShell で設定するのであれば、以下をコピペします。(要管理権限)
|
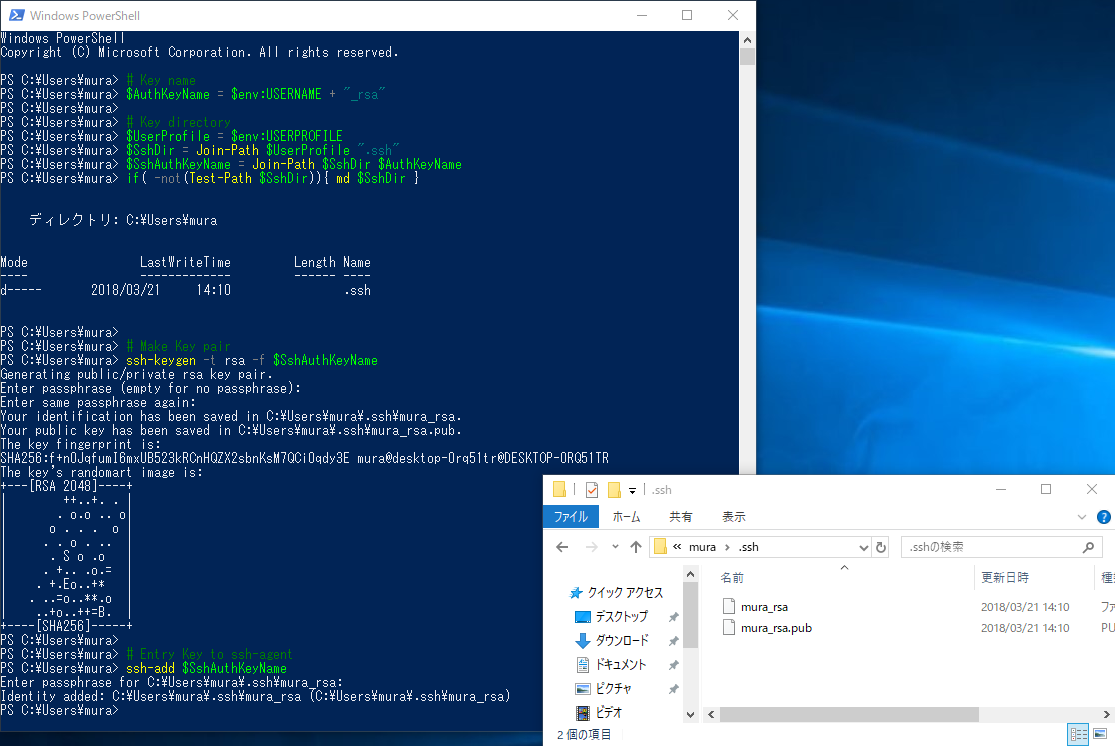
鍵ペアの作成は ssh-keygen で作成します。
ssh-keygen -t rsa -f 鍵ファイル名
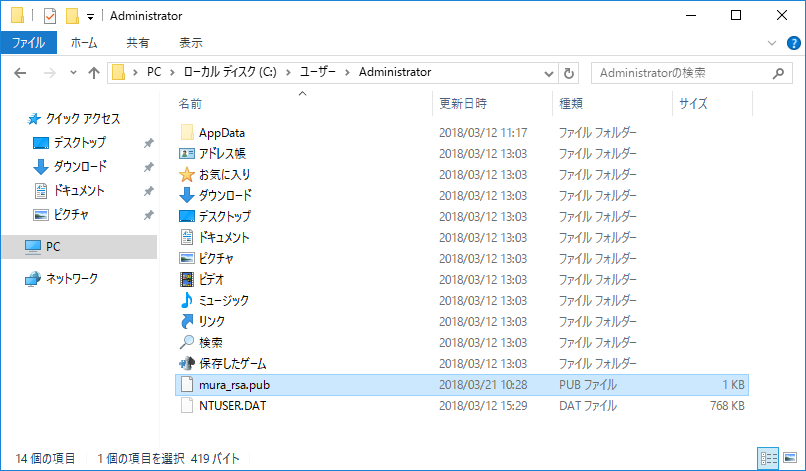
鍵の配置場所は、ユーザープロファイルディレクトリ直下の「.ssh」フォルダを作成し、そこに置きます。
ピリオドで始まるフォルダーは GUI で作成できないので、コマンドで作成する必要があります。
鍵ペアを作成する際には、セキュリティを維持するために秘密鍵にパスフレーズ(最低文字数5文字)を設定します。
秘密鍵にセットしたパスフレーズは、リモート接続の際に都度入力が必要ですが、ssh-agent に秘密鍵を登録しておくと、パスフレーズ入力を ssh-agent が代行してくれるので運用が楽になります。
ssh-agent への登録は以下のようにします。
ssh-add 秘密鍵ファイルパス
PowerShell で鍵ペアの作成と、ssh-agent 登録をする場合は以下のようにします。
|
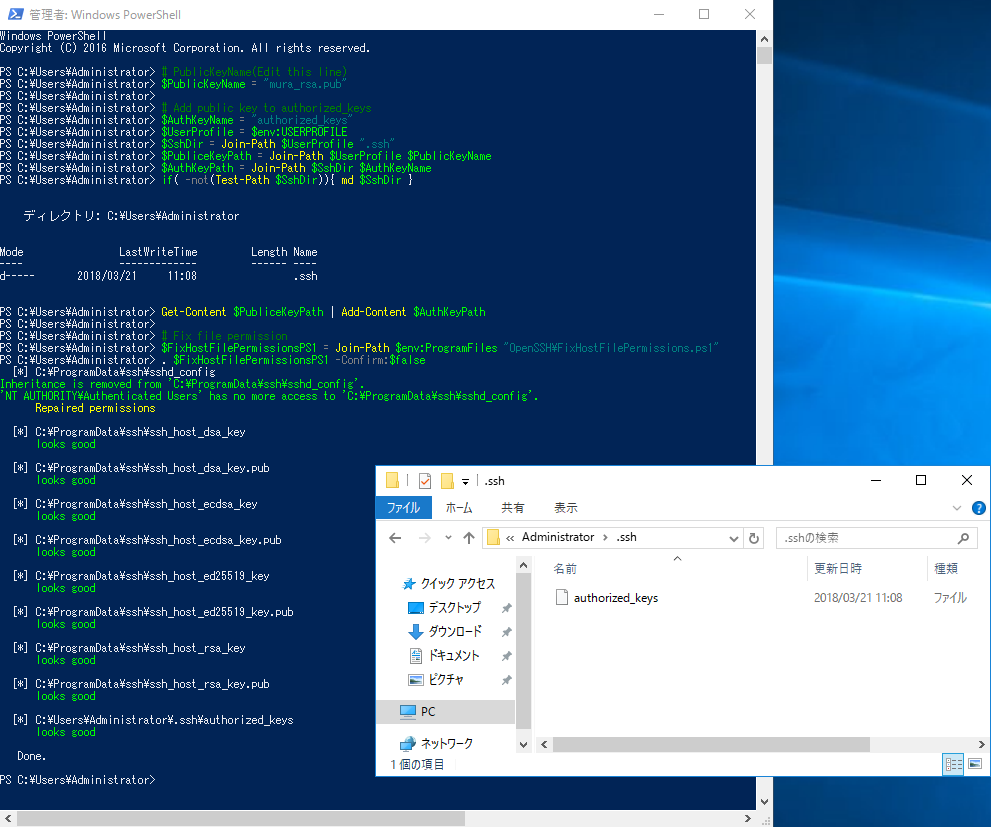
Server 側には、Client 側で作成した公開鍵を登録します。
公開鍵を登録する先は、ログオンするアカウントのプロファイルフォルダ直下に .ssh フォルダを作成し、authorized_keys に公開鍵(.pub)追加します。
公開鍵を追加しただけだと、パーミッションが不整合になっている事があるので、ssh ツールである FixHostFilePermissions.ps1 でパーミッションを調整します。
PowerShell で設定するのであれば、ログオンするアカウントのプロファイルフォルダに公開鍵をコピーし、公開鍵名を指定($PublicKeyName に公開鍵ファイル名をセット)して以下スクリプトをコピペします。(要管理権限)
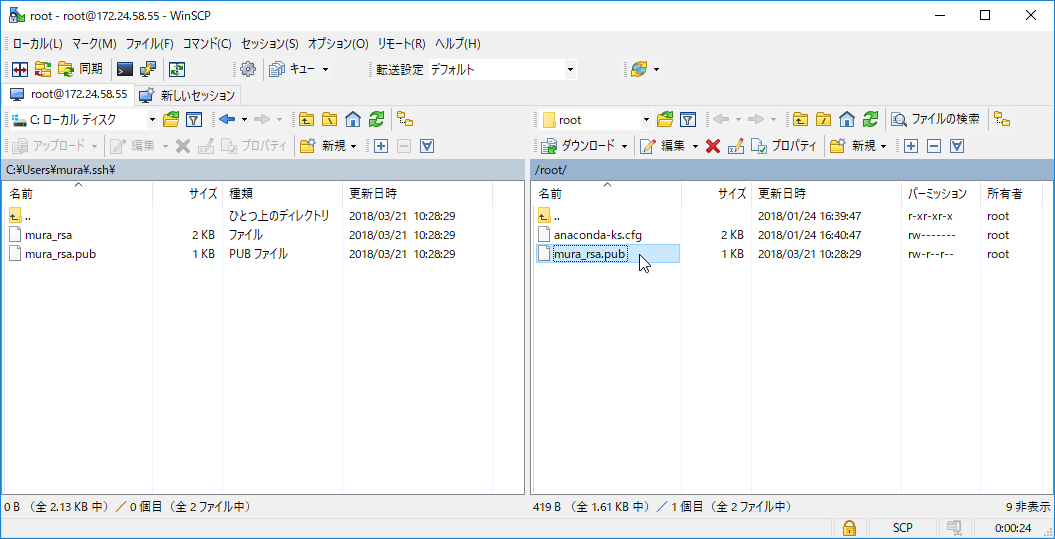
公開鍵のコピーは、scp.exe がお手軽です。
Client 側から PowerShell でコピーするのならこんな感じです。
| ### Public Key copy for Windows Server # Terget Server / User $TergetServer = "192.168.33.83" $TergetUser = "Administrator" # Key name $PublicKeyName = $env:USERNAME + "_rsa.pub" # Key directory $UserProfile = $env:USERPROFILE $SshDir = Join-Path $UserProfile ".ssh" $SshPublicKeyPath = Join-Path $SshDir $PublicKeyName # Copy Public Key scp $SshPublicKeyPath ( $TergetUser + "@" + $TergetServer + ":C:\Users\" + $TergetUser) |
コピーした公開鍵
コピーした公開鍵を .ssh\authorized_keys に追加し、パーミッションを調整します。
PowerShell でコピーするのならこんな感じです。
|
PowerShell 6 を開き、サーバー側に対し、PowerShell リモーティングコマンドレットを叩きます。
例えば、administrator として接続するのであれば、以下のようにします。
Enter-PSSession -HostName 172.24.58.68 -UserName administrator
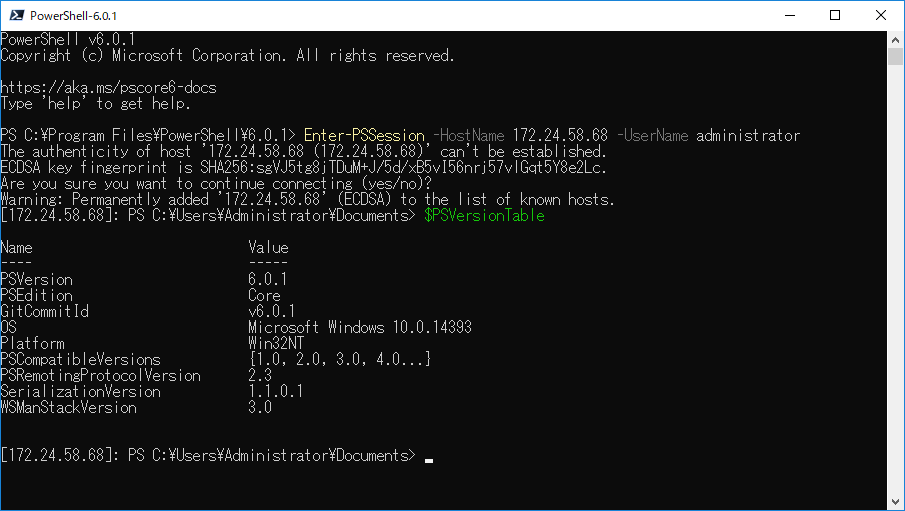
公開鍵認証にしているのでパスワードも聞かれず接続が完了しました。
パスフレーズは、ssh-agent が処理しているので、パスフレーズすら聞かれません。
パスワードを聞かれる場合は、-KeyFilePath オプションで秘密鍵のパスを指定します。(初回のみ)
パス指定は
-KeyFilePath ~\.ssh\mura_rsa みたいな感じで
CentOS 7 の場合も、Windows Server と同様に、公開鍵をユーザーディレクトリ直下に .ssh フォルダを作成し、authorized_keys に公開鍵(.pub)追加し、パーミッションは、ディレクトリに 700、authorized_keys に 640 をセットします。
CentOS 7 への公開鍵送り込みも scp.exe が使えるので、Client 側から PowerShell でコピーするのならこんな感じです。
| ### Public Key copy for CentOS 7 # Terget Server $TergetServer = "192.168.33.75" $TergetUser = "root" # Key name $PublicKeyName = $env:USERNAME + "_rsa.pub" # Key directory $UserProfile = $env:USERPROFILE $SshDir = Join-Path $UserProfile ".ssh" $SshPublicKeyPath = Join-Path $SshDir $PublicKeyName # Copy Public Key scp $SshPublicKeyPath ( $TergetUser + "@" + $TergetServer + ":~/" ) |
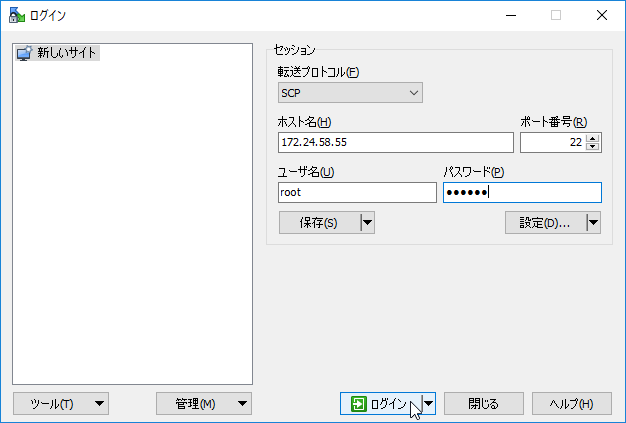
GUI で操作したいのなら、WinSCP が便利です。
WinSCP :: Official Site :: Download
https://winscp.net/eng/download.php
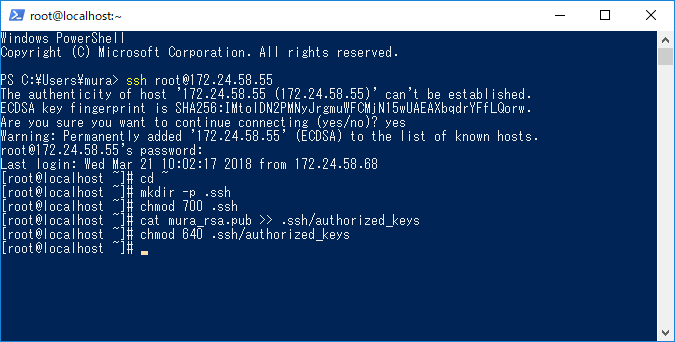
公開鍵をユーザーディレクトリにコピーしたら、CentOS コマンドで公開鍵を authorized_keys に追加します。(PowerShell で書いてみたのですが、うまく動かなかったのでここだけ生でコマンドを打ちます)
| cd ~ mkdir -p .ssh chmod 700 .ssh cat mura_rsa.pub >> .ssh/authorized_keys chmod 640 .ssh/authorized_keys |
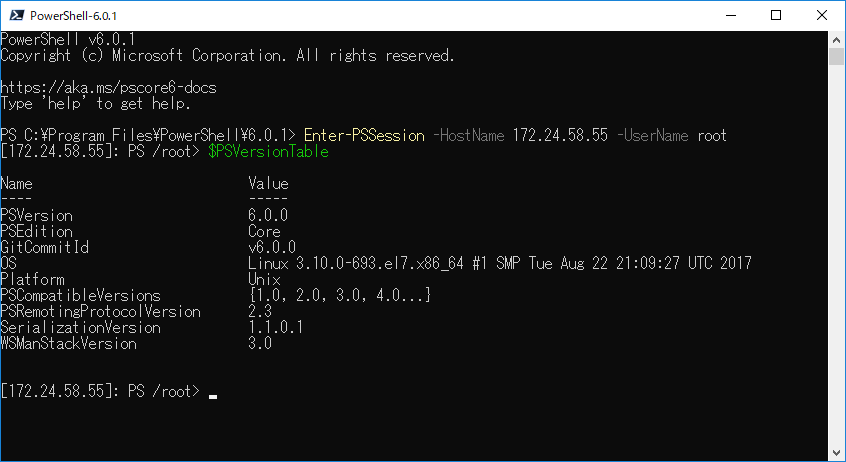
CentOS 7 の場合も、Windows Server と同様に PowerShell 6 を開き、サーバー側に対し、PowerShell リモーティングコマンドレットを叩きます。
例えば、root として接続するのであれば、以下のようにします。
Enter-PSSession -HostName 172.24.58.55 -UserName root
明示的に秘密鍵を指定する場合は、-KeyFilePath オプションに秘密鍵のパスをセットします。
秘密鍵の指定はこんな感じですね
-KeyFilePath ~\.ssh\mura_rsa
公開鍵認証なので、パスワードは聞かれませんし、ssh-agent を使っているので秘密鍵のパスフレーズも聞かれずに CentOS に接続ができます。
CentOS 7 での鍵ペア作成と、ssh-agent への秘密鍵登録も Windows Client と同様です。
CentOS 使いの方であれば、この辺りは常識の範囲だと思いますので、説明は割愛します(手抜きご容赦)
最後に今回のまとめです
・Windows Server 2016/Windows 10 1709 以前は Win32-OpenSSH
インストール(install-sshd.ps1)
・ssh-agent 自動起動設定
・ssh-agent 起動
・ユーザープロファイルディレクトリ直下に「.ssh」を作成
・ssh-keygen -t rsa -f
鍵ファイル名 で .ssh に鍵ペア作成(パスフレーズつける)
・ssh-add 秘密鍵ファイルパス
・ユーザープロファイルディレクトリ直下に「.ssh」を作成
・公開鍵(.pub)を
.ssh\authorized_keys へ追加
・パーミッション調整(FixHostFilePermissions.ps1)
・ユーザーディレクトリ直下に「.ssh」を作成
・公開鍵(.pub)を .ssh\authorized_keys
へ追加
・パーミッション調整(ディレクトリに 700、authorized_keys に 640)
Enter-PSSession -HostName 172.24.58.55 -UserName root
秘密鍵指定が必要な場合は -KeyFilePath オプションで秘密鍵のパスを指定
PowerShell 6 へリモート接続する(Windows 編)
http://www.vwnet.jp/windows/PowerShell/2018020501/ConnectRemotePS6.htm
PowerShell 6 へリモート接続する(クロスプラットフォーム/パスワード認証編)
http://www.vwnet.jp/Windows/PowerShell/2018031701/PsRemoteOverSSH.htm
リモート コンピューターの対話操作(Enter-PSSession)
http://www.vwnet.jp/windows/PowerShell/EnterPSSession.htm
リモート コンピューターのバッチ操作(Invoke-Command)
http://www.vwnet.jp/windows/PowerShell/InvokeCommand.htm
リモート コンピューターのパラレル バッチ操作(Invoke-Command -AsJob)
http://www.vwnet.jp/windows/PowerShell/Invoke-CommandAsJob.htm
PowerShell 6.0 on CentOS 7
http://www.vwnet.jp/Windows/PowerShell/2018012401/PS6onCent7.htm
Install Win32 OpenSSH - PowerShell/Win32-OpenSSH Wiki
https://github.com/PowerShell/Win32-OpenSSH/wiki/Install-Win32-OpenSSH
SSH 経由の PowerShell リモート処理PowerShell Remoting Over SSH |
Microsoft Docs
https://docs.microsoft.com/ja-jp/powershell/scripting/core-powershell/ssh-remoting-in-powershell-core?view=powershell-6
![]()
![]()
Copyright © MURA All rights reserved.